

View Management - New Update
- Mariano Martinez Melo

- Jun 20, 2023
- 3 min read
Looking back on the beloved Ax 2012 and its customization menu, 365 has done its part to bring this well-known tool up to date. Do you want to know how to use it? Let's see it here!

We've all become familiar with Ax 2012's customization menu that we accessed with the right click and could add and hide columns. In Dynamics 365, we have kept that menu friendlier, where we can perform almost the same functionality. And I say almost because the relationships between tables are no longer possible to show fields in the grids, but beyond that, the menu is very friendly.
We have to place ourselves in any grid and go to the gear menu, and from there, we will have the customize menu. This opens a series of options depending on the form in which we are located.

The options to hide and add a field are the same as in 2012. With Hide we can hide a column, for this we press the hide button and then press the field or column to hide, it will turn Orange indicating that it is hidden.

Add Column lets us add fields to a grid or form. Pressing it will show us a drop-down dialog with a selection of fields to add. After selecting the ones we want, they will appear at the end of the form.

Note. The option to create a new field allows us to associate a new customizable field to the table. As a restriction, it leaves us up to 20 fields per table. In a future post, we will discuss managing these customizable fields.
Move lets us arrange the columns and fields as we need. Skip lets us skip a field when loading a new record by pressing the tab key. However, If it is required, it will ask us to upload the information.
Show in header, add in a header menu the information of the fields we select, and finally, the option to block does not allow us to enter information in a field to avoid all kinds of changes.
Finally, from the three points, we have the Delete option, which deletes all the customizations made, and the import and export options to share them with another user.
As of Update 33, we have a plus for managing these views since it is possible to save and share several views between users. To do this, we must first activate the "Saved Views" feature within the Feature Management workspace:

Once enabled, we can go to any form, such as the one for all purchase orders, and a new control called "my view" will appear. When a view is modified, it will appear with an asterisk next to the name, and we can save it from that same control:

If we press save, it will update the standard view, and it will be the one that will be loaded every time we open the form. On the other hand, if we click save, we can give it a name, which will be saved in a list of usable views. In the latter case, a menu opens where we can enter the name and description and mention if we anchor it as the default view, which will be loaded by default when entering the form.
Saving views allows us to select the one we want from this menu by simply pressing My View to select the desired view:

We can manage our views from the three points from this same menu. The publish button lets us publish the view to the organization by assigning the user roles that should see it:
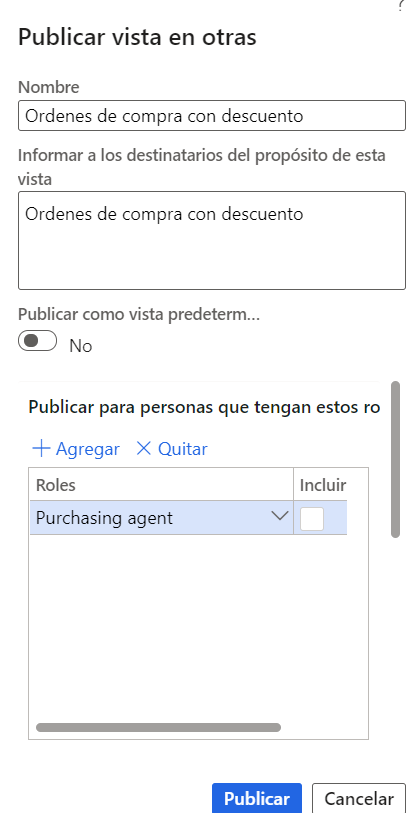
In the beginning, we will see the same information as when saving a view, but later we can add the user roles to make this view visible. Finally, we will have a section for access by the legal entity to allow us to filter by the organization.
Within the Manage my views option, we will see the following dialog:
Al inicio veremos la misma información que al guardar una vista, pero luego podremos agregar los roles de usuario a los cuales dejaremos que esta vista sea visible. Finalmente tendremos un apartado de acceso por entidad jurídica que nos dejará filtrar también por organización.
Dentro de la opción de Administrar mis vistas, veremos el siguiente dialogo:

Here it will allow us to reorder our list of views and also change the names of our views. From the three points we can delete or publish a selected list.
Finally, if we go to the Organization Views section, we can see all the lists published by users and import the view we want.

From the Save as a personal button, we will import it to our menu, and we can start using it.
This is a great tool for key and end users to customize and share the screens.


Comments